You Ask, I Answer

Questions from Nannette: "I'd like to know how you begin. Do you grid? Do you use graphite? Do you use photos to work from - and if so do you take them yourself? What other subjects do you enjoy besides pebbles? Is there something you really don't like to draw?"

I take my own photo references since my creative process is deeply entwined with the subjects I study and - dare I say - even obsess over. Photos are secondary to my vision and I always seek to recreate those images that are already in my mind. I rarely get a perfect picture! I'm not a great photographer but I compensate by taking hundreds of shots. Below are examples of experimentation with pebbles and ice that I did at home.

Experimenting with Pebbles and Ice

More Experimenting

I usually work on the composition in Photoshop from one or several images. Then I trace a rough outline directly from the computer monitor onto a sheet of tracing paper using a soft graphite pencil and a very light touch. Sometimes I free-hand the outline, depending on the complexity (I don't grid anymore but I used to). Finally I scan the pencil drawing and enlarge it with this program: PosteRazor: Make your own poster!

After printing out the enlargement and taping the individual sheets together, I trace the drawing onto the final paper. In the picture below you can see me tracing over a sheet of glass. At this stage I use Verithin colored pencils in the local colors of the drawing because I don't like to erase graphite.

Improvised Light Box

Whenever possible I prefer to work directly from the computer monitor versus a printed photo. It gives me more freedom during the "painting" phase. I can adjust colors and values, enlarge details, lighten dark areas, not to mention the saving in printer ink and photo paper.

Work Station

In the past I've explored various subjects and techniques, however in the last several years I've been focused on flowers and rocks and their interaction with water. I study them above water, below, and in-between, and observe how their visual characteristics change and relate to each other.

In general I don't enjoy drawing man-made things like buildings, cities, cars, or mechanical objects.

Thank you Nannette for asking these questions. It gave me an opportunity to share my thoughts and process with other artists.

More "You ask, I Answer" posts coming up in the near future. Look for a post on "burnishing" and another on "how I make my pebbles shine".

If you have questions that relate to my art and especially my process and technique, please feel free to ask them in a comment.

Media Organizer Step-by-Step

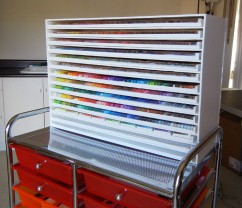
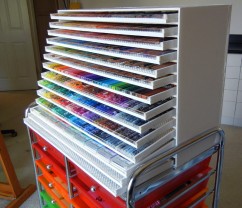
I promised to some of you to put together the step-by-step directions for building a media organizer like mine. Please refer to my previous post for images and description of the unit. Following are detailed instructions on how to build it.

Materials:

  • 6 sheets of  foam board 30" x 40" x 3/16" thick
  • 1 piece of plexiglass (clear acrylic) 12" x 24" x 1/8" thick (0.125")
  • glue gun, acrylic cutting knife
  • white artist tape
  • non-slip liner (optional)

Steps:

  1. Cut the foam board
  2. Build the main structure
  3. Build the trays
  4. Cut and glue the plexiglass
  5. Cut non-slip liners to size (optional)

1. CUT THE FOAM BOARD

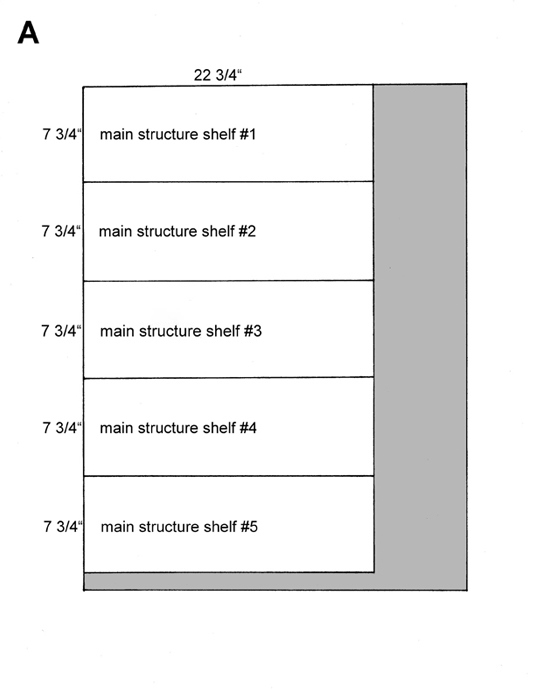
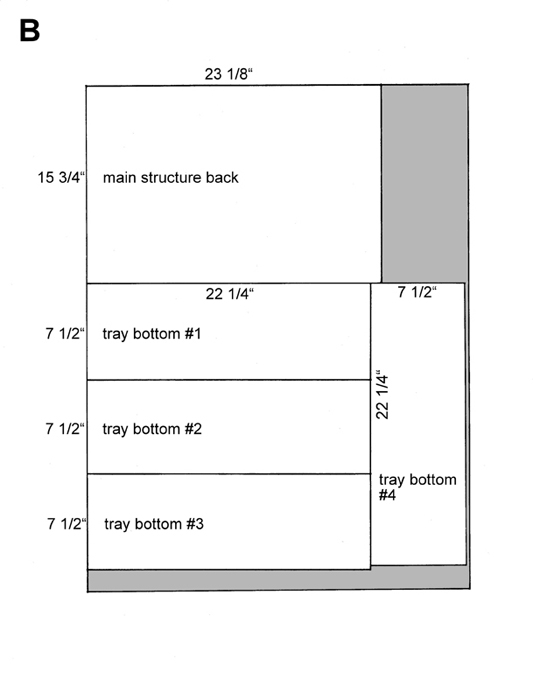
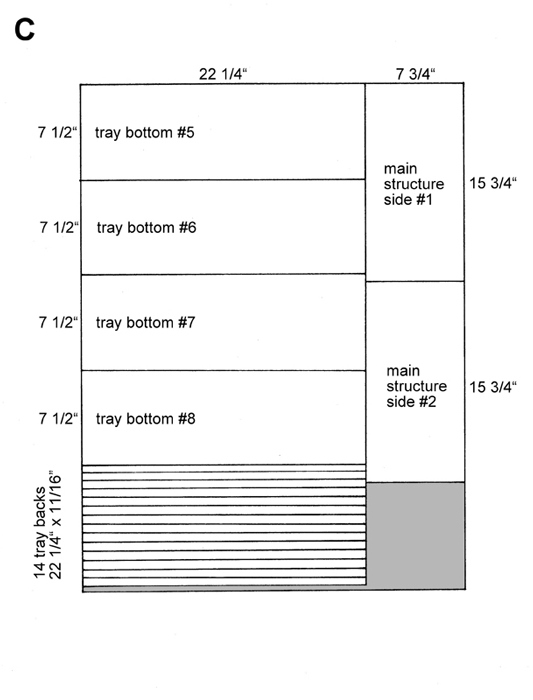
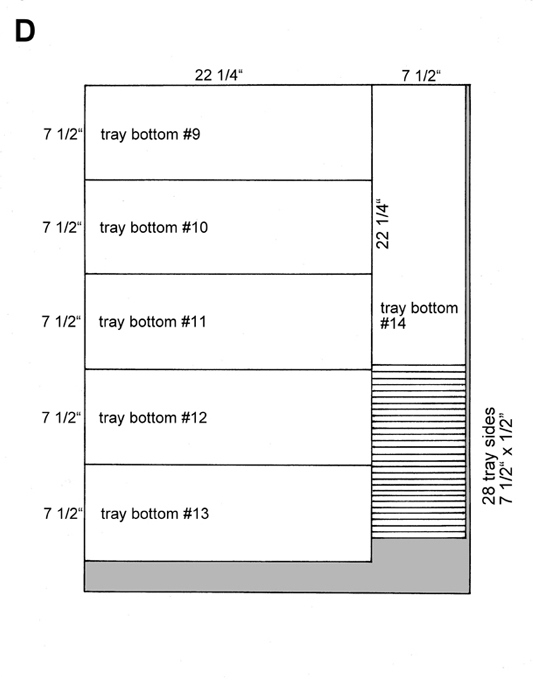
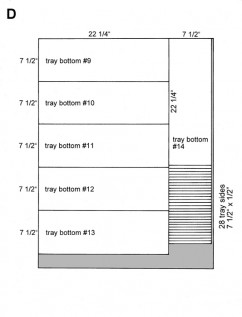
Use the four drawings below as guidelines. The white areas represent all the foam board pieces that you'll need for this project, while the gray areas are the left-overs. Remember that if you use smaller foam boards (20" x 30") you will have a lot more waste. Be very precise when you measure, draw, and cut your pieces.

Each drawing is a scaled representation of a 30" x 40" foam board. Drawing A needs to be repeated on three separate foam boards. Drawings B, C, and D are only used one time each (six boards total).

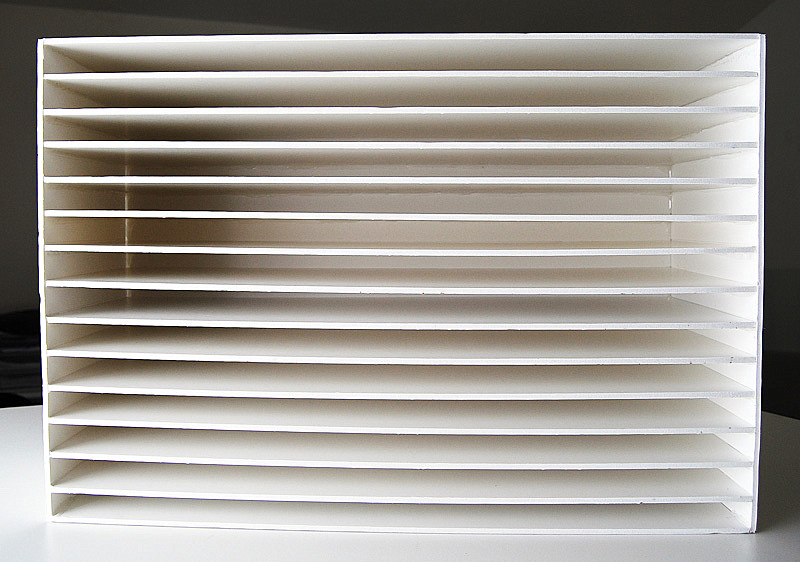
The media organizer is composed of two parts:

  • the main structure, made of 15 shelves, two sides, and one back
  • 14 removable trays, each one made of one bottom, one back, two sides, and a plexiglass front

Main structure dimensions:

  • 15 shelves: 22 3/4" wide x 7 3/4" each
  • 2 sides: 15 3/4" high x 7 3/4" each
  • 1 back: 15 3/4" high x 23 1/8"

Trays dimensions:

  • 14 bottoms: 22 1/4" x 7 1/2" each
  • 14 backs: 22 1/4" x 11/16" each
  • 28 sides: 7 1/2" x 1/2" each

Drawing A

Drawing B

Drawing C

Drawing D

2. BUILD THE MAIN STRUCTURE

This is the most challenging part of the project. I hope that by explaining how I did it, I can make it a little easier for you.

First you need to draw on both sides and on the back of the main structure the guidelines for the shelves.

Please note that the 15 shelves are a little less than one inch apart from each other. Sorry, I don't have the measurements for this step; you'll have to do the math.

When you have all your guidelines drawn, you can start gluing.

Gluing technique:

  • place a strand of glue at the seam where the two surfaces meet
  • do not place the glue directly on the foam of the board - the heat will melt the foam
  • hold the foam board pieces in place until the glue cools down and feels solid

Begin by gluing together the two sides onto the back of the main structure. Then move on to the shelves.

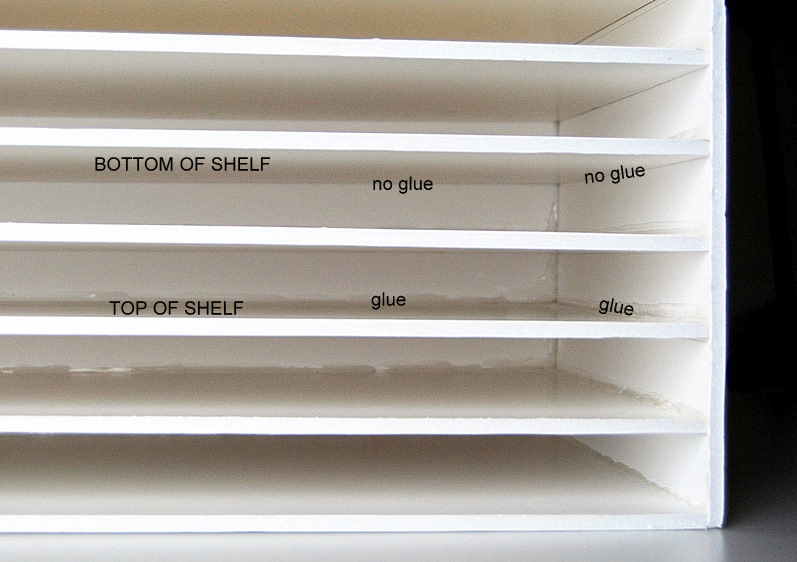
Proceed by gluing one shelf at a time. Make sure the shelf is in the right position. Place your glue strands on the three seams. Wait for the glue to cool down and move on to the next shelf until you are finished. Remember to place the glue only on the top side of the shelves, not the bottom (see picture #1 and #2).
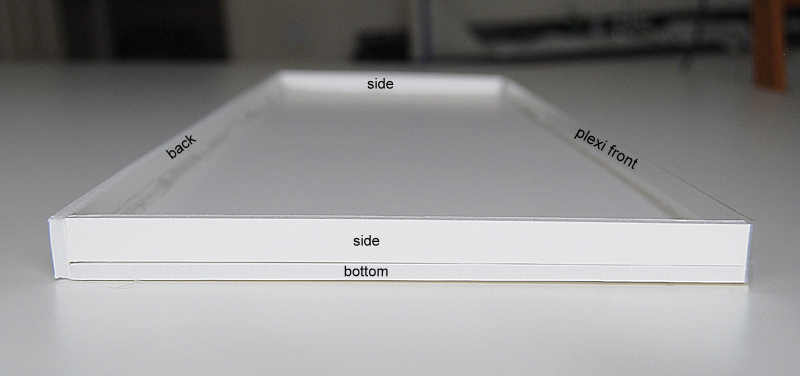
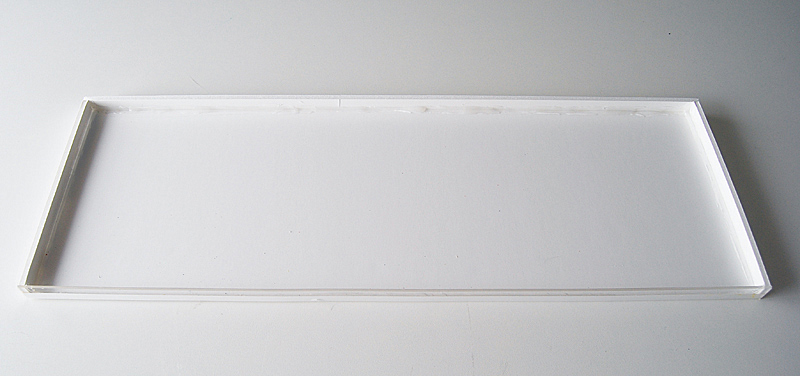
Picture #1: Main Structure Close-up

Picture #2: Main Structure

3. BUILD THE TRAYS

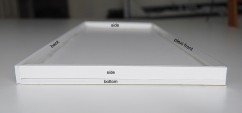
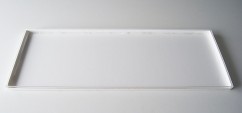
Glue the back of each tray to the bottom. Then glue the two sides over the bottom. See pictures #3 and #4.

Picture #3: Tray Side View

Picture #4: Tray Top View

4. CUT AND GLUE THE PLEXIGLASS

Do not remove the protective film from the plexiglass. You need 14 strips, each measuring 22 1/4" x 11/16". Draw your guidelines directly on the film.

If you have never cut plexiglass before, please practice a little before cutting the strips. I use the "score and snap method" with this type of knife.

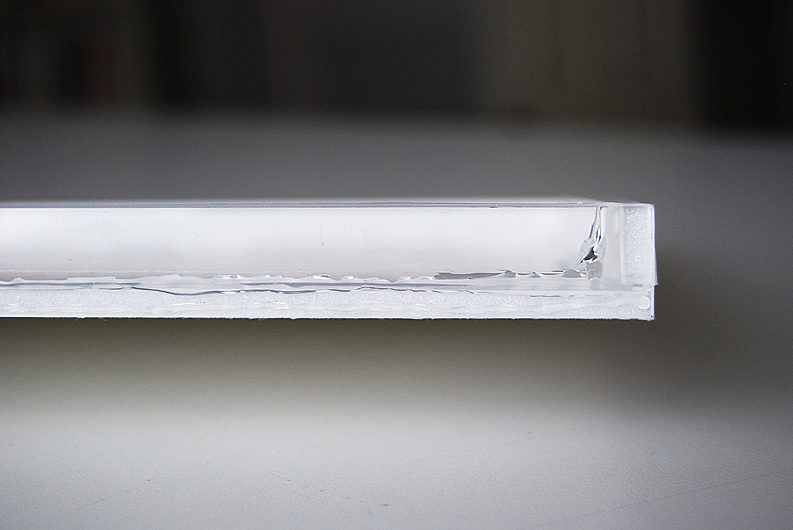
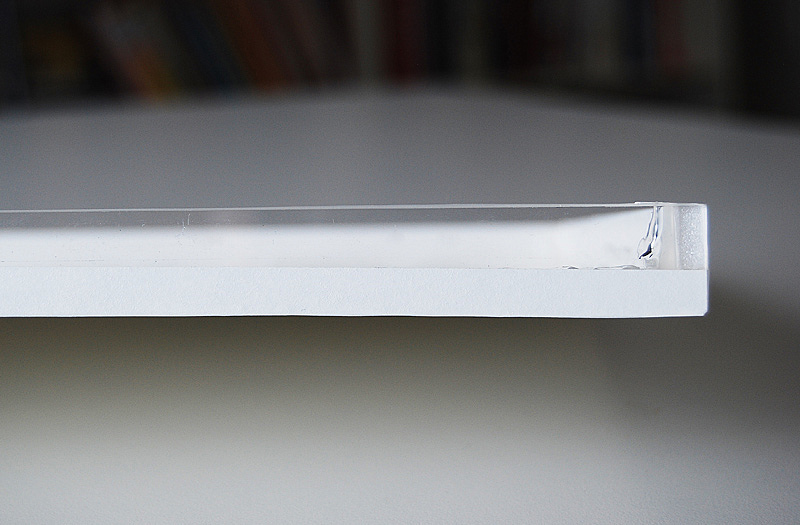
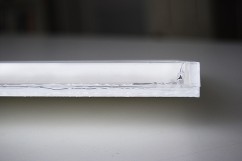
When you glue a plexiglass strip to a tray, it will look as in picture #5 where the glue is completely visible. I hid the glue with white artist tape for aesthetic reasons (picture #6).

Picture #5: Tray Front Showing the Glue

Picture #6: Tray Front with Tape

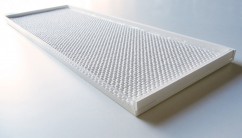
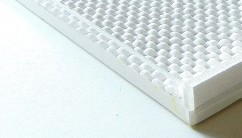
5. CUT NON-SLIP LINERS TO SIZE

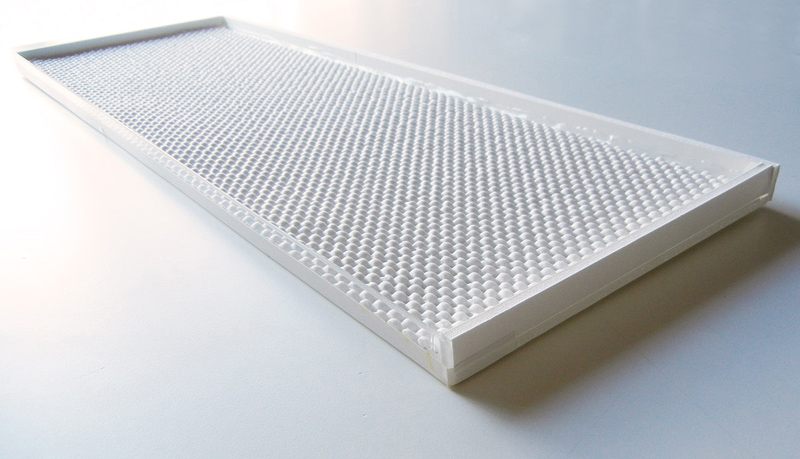
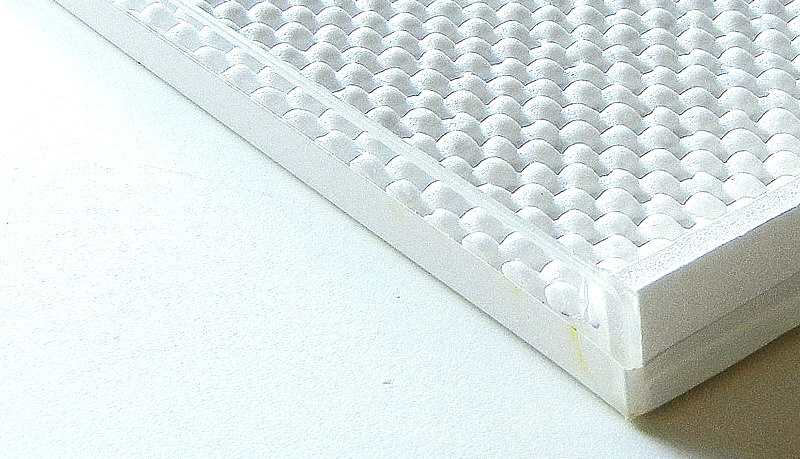
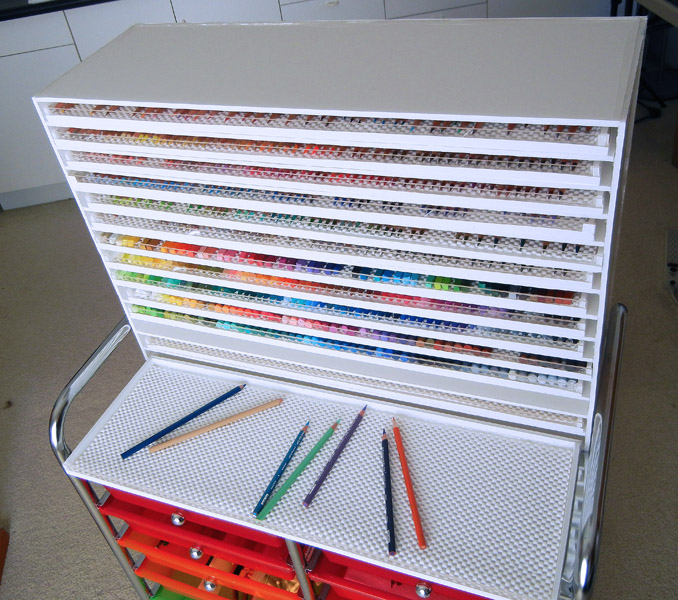
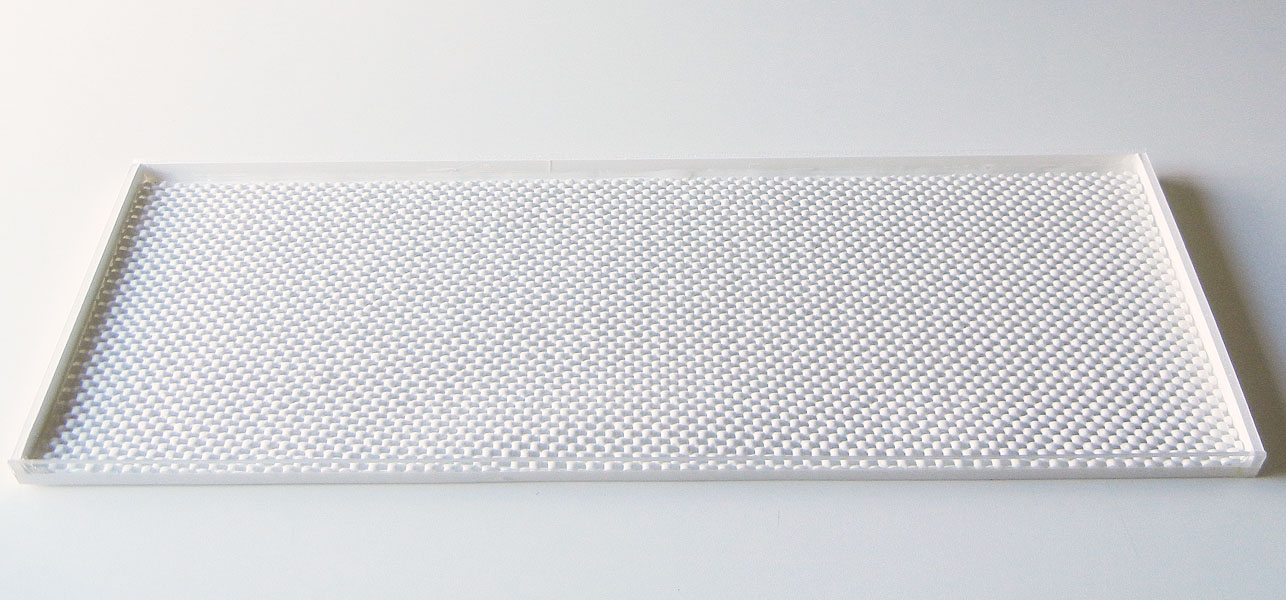
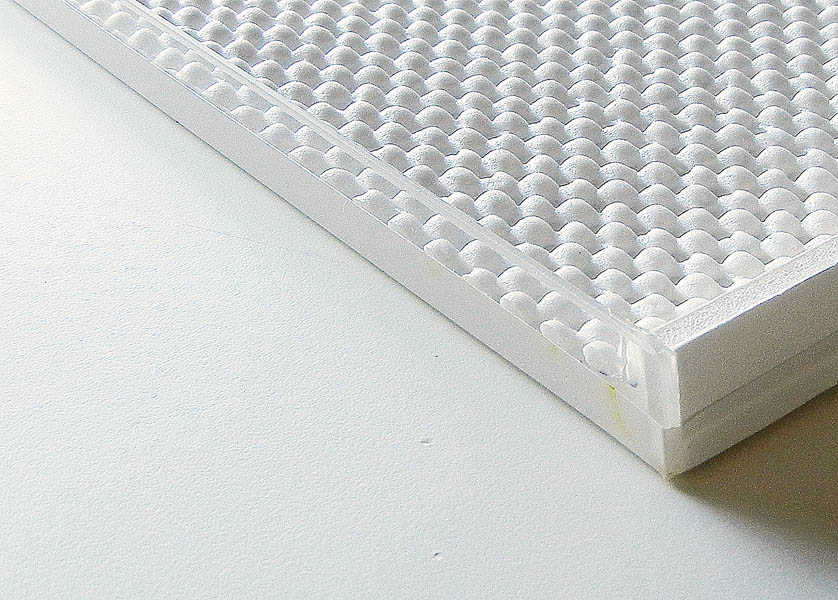
This is an optional step but I highly recommend it. I purchased the non-slip liner from my local home improvement store. It keeps pencils and other media from rolling even if the tray is on a slant (see pictures #7 and #8). The measurements of each liner are: 21 3/4″ x 7 1/4″.

Picture #7: Tray with Liner

Picture #8: Close-up

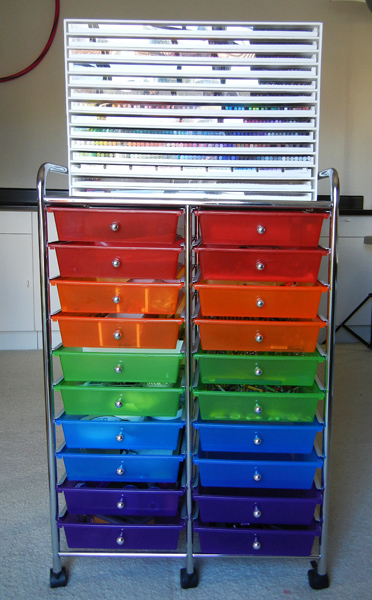
Last but not least, turn your main structure upside-down so that the glue strands of the shelves are on the top, not on the bottom of the slots. This way there's no interference with the sliding of the trays.

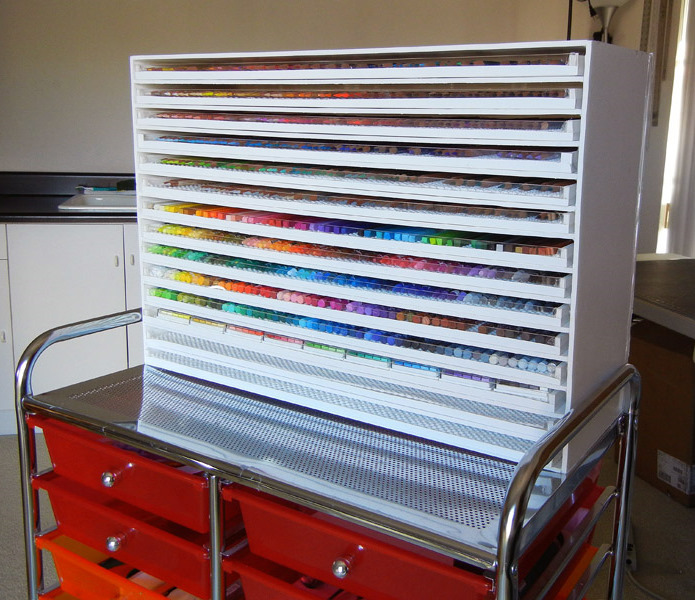
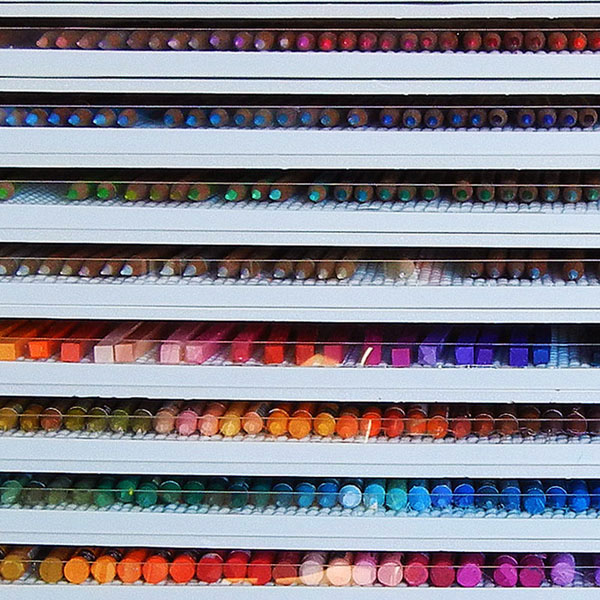
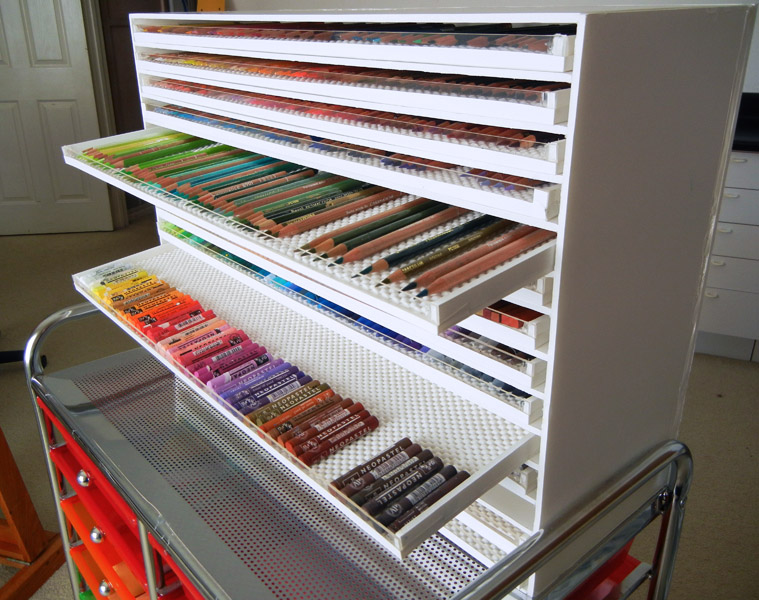
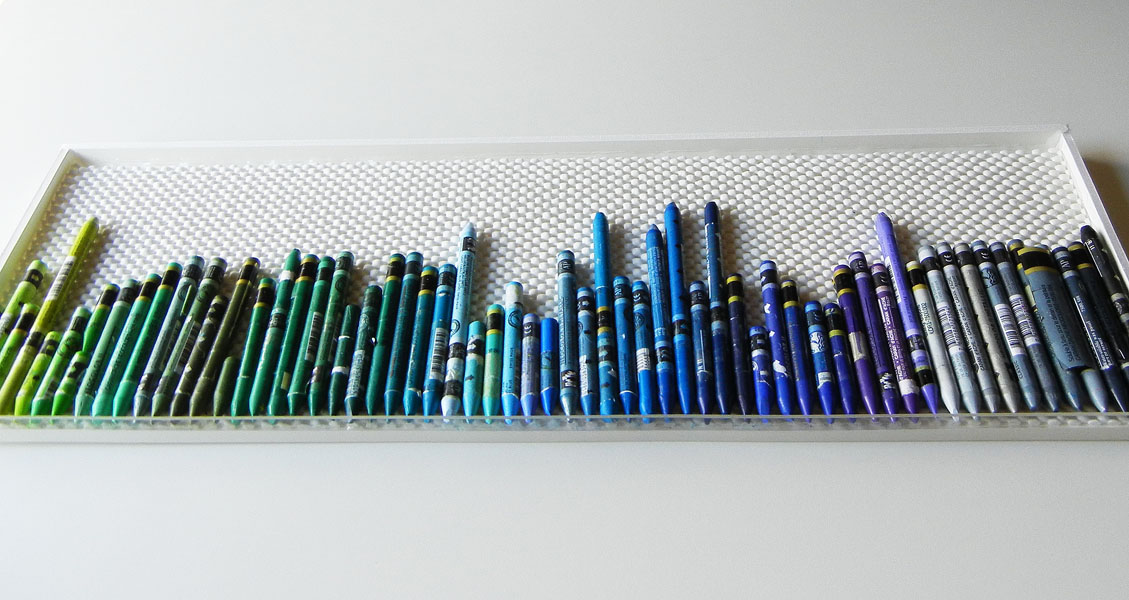
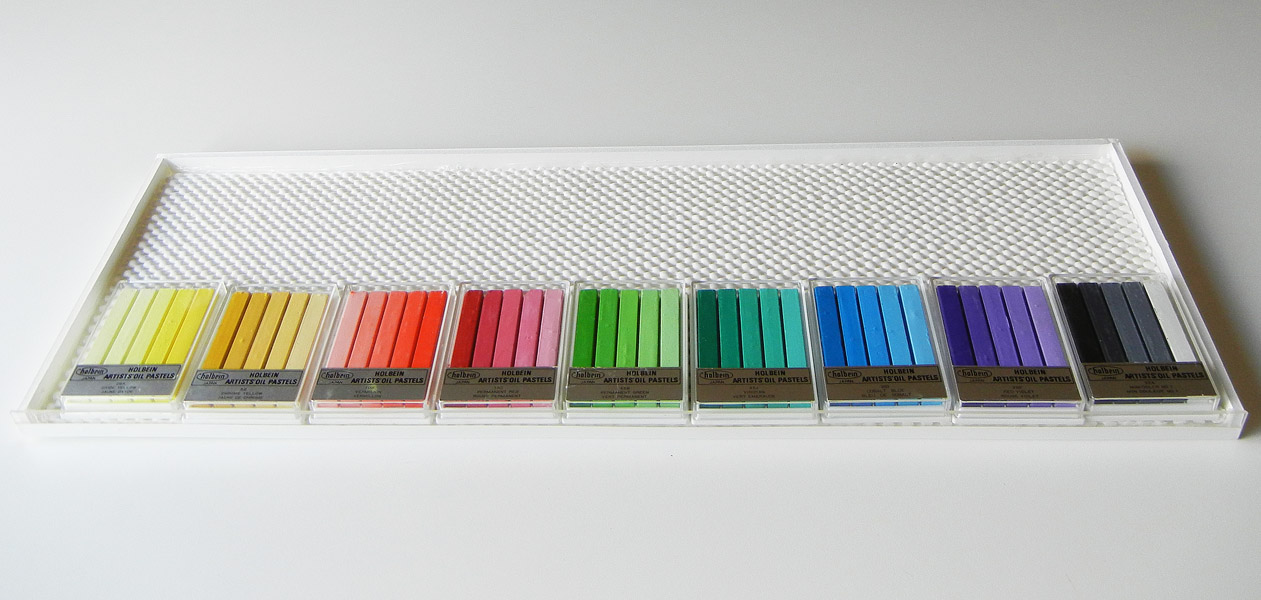
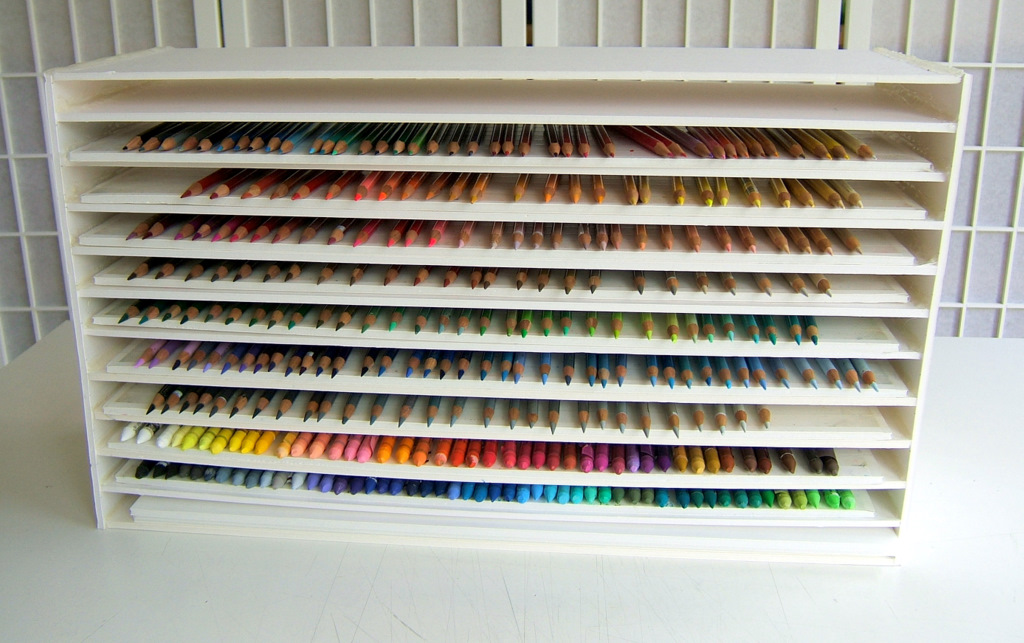
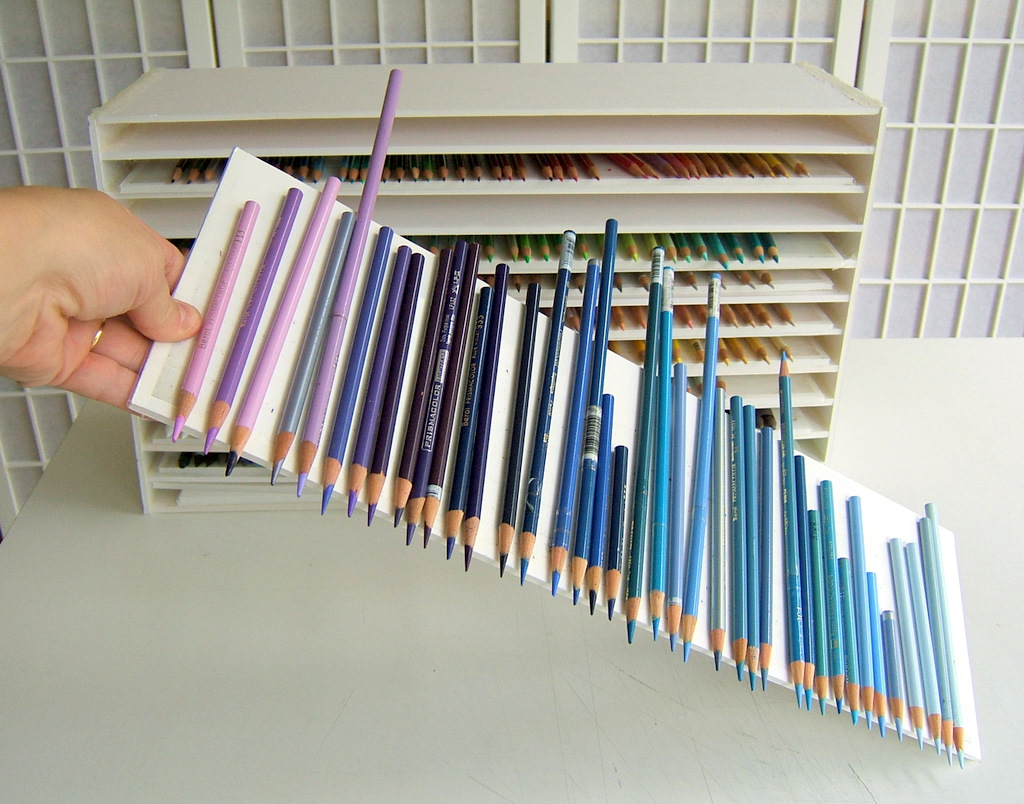
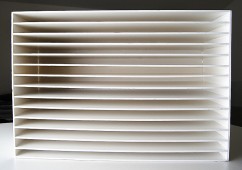
After filling your trays with colorful media, from pencils to crayons and pastels, you can place them inside their slots (picture #9 and #10). Now you can finally enjoy your creation.

Let me know if this was helpful. Feel free to ask any questions along the way.

Picture #9: Media Organizer

Picture #10: Trays Pulled Out

My Art Studio: New Media Organizer

Everybody has a different way to relax; mine is to build something with my hands. That's how this new media organizer came about. My previous one was old and frail and after five years of daily use I could definitely envision a much improved model. I spent a full day planning, cutting, gluing and I'm very pleased with the results.

Media Organizer

Front View

Close-up

My media organizer is a shelf unit with 14 movable trays where I store all my wax-based drawing media (colored pencils, artist crayons, and oil pastels). I place it on top of my taboret right by my desk .

One of its best feature is the plexiglass on the front of each tray. It lets you get a clear view of what's inside without having to pull the tray out.

Trays Pulled Out

Two Trays Out

Top View

The trays can be pulled out together for complete accessibility of media or individually. They are deep enough that they can hang from the unit without falling.

Colored Pencil Trays

Artist Crayon Tray

Oil Pastel Tray

Sometimes I prefer to place several trays directly on the desk. I usually do this when I select the main colors of my drawing.

Empty Tray

Side View

Close-up

Tray dimensions:
bottom - 22 1/4" x 7 1/2"
back - 22 1/4" x 11/16"
sides - 7 1/2" x 1/2"
plexiglass front - 22 1/4" x 11/16"
non-slip liner - 21 3/4" x 7 1/4"

Structure dimensions:
15 shelves - 22 3/4" x 7 3/4"
sides - 15 3/4" (high) x 7 3/4"
back - 15 3/4" (high) x 23 1/8" (corrected - was 22 3/4")

Materials: foam board (3/16" thick), plexiglass (the thinnest you can find), non-slip liner, and a glue gun.

Having my media accessible and organized makes my workflow so much more fluid. I can concentrate on my art and don't have to waste time looking for things.

Feel free to ask questions if you need more clarifications.

Edit (2/27/2011): for step-by-step instructions visit this blog post.

Looking Back at 2010

Looking Back at 2010

Below are some highlights from my first year of blogging.

You can click on any image to visit the related post.

Studio Swing

Speckling Technique

Best of Show

Glassless Framing

Sanded Pastel Paper

Pratiques des Arts

CPSA Convention

CPSA Workshop

Sanford Prismacolor Award for Exceptional Merit

Shortcut for Details

Icarus Art's YouTube Channel

Thank you for visiting my blog. Your feedback is always appreciated.

Virginia Carroll

Virginia Carroll, a very successful artist from Arizona, recently came to my studio for a visit. When she found colored pencil, she began producing drawings at such a rate that she was able to collect a body of work exceeding 40 drawings in the space of seven months, and was given a "one man" show at the Hilltop Gallery in Nogales. Virginia senses beauty in all things, be it nature, architecture or a composed still life, and cannot limit herself to only one of them. She loves the flora and fauna of the desert, buildings and people, and will continue to explore the beauty in all things.

Virginia Carroll

Pomegranate's Beginning

http://www.virginiacarroll.com/
"Pomegranate's Beginning" was made with the Icarus Drawing Board

Betzi Stein

Meet Betzi Stein, Los Angeles-based colored pencil artist who came to my studio for a visit after becoming a devoted user of the Icarus Drawing Board. In addition to colored pencil, she also paints and does collage.  A professional massage therapist and portrait artist, she is an avid violinist, a long-term meditator and has a background in jewelry design and sculpture.  She has always been drawn to portraying the human figure in all her artistic endeavors.

Betzi Stein

Massage Series 1

http://www.betzistein.com/
http://www.betzisteinmassage.com/

Barbara Rogers

Barbara Rogers is a California artist who recently came to my studio. She's the president of the Los Angeles Colored Pencil Society Chapter. In her website you can see examples of her beautiful California coastal landscapes and figurative works. She's adept in both oil and colored pencil. I particularly love her landscapes.

Barbara Rogers

Winter Day - Pebble Beach

Back in the Swing of Things

It took two weeks after the CPSA convention to get back to a daily routine and, as you can see from the pictures below, I'm definitely back to "normal". Here are some things to look forward in the near future:

  • New artwork
  • An Icarus Art Newsletter
  • A new video page for the Icarus Art website and a YouTube account
  • A free selection of video clips from my CPSA workshop

My Art Studio: Part 2

Organization for me is not a choice, it's a necessity. I was not blessed with one of those brains that can function in a chaotic atmosphere. My differences are not apparent because early in my life I learned on my own how to cope with them. I started using color coding in elementary school. Through the years I have developed many sophisticated ways to organize, categorize and classify the outside world. For example, in my mid forties I devised a color coding system that helped me learn how to read music and play the piano. My 'to-do' list, which I update daily, is arranged in five separate color schemes that correspond to different areas of interest. One of my favorite gift from my husband is a "label maker" - jewelry doesn't even come close.

Several years ago I devised a way to keep my colored pencils, crayons and oil pastels organized. Here are four images to illustrate my system. Perhaps some of you will get inspired to make one of your own.

Shelf Storage Unit

Single Shelf

Materials needed:  3/16" Gator Board for the shelf storage unit, regular foam board for the individual shelves,  removable, double-sided tape, regular tape, and a glue gun. Each movable shelf measures 6" x 20". Several strips of removable, double-sided tape are placed lengthwise on each shelf and secured on the 6" side with regular tape. This results in a low tack surface where the pencils, crayons, oil pastels can stay put and organized by colors.

More Shelves

Inventory Storage Unit

The last image is that of my inventory storage unit where I can keep up to 18 colored pencils in each cell. This was built with regular foam board, a glue gun, and a lot of patience.

A Whole New Point of View

A Whole New Point of View

As an artist I'm always searching for different ways to look at the world around me. In my latest piece, "The Lightness of Being", you can see how simple poppies transform into ethereal creatures when turned upside down.  What do you do to get a whole new point of view?